

So, you want to create a LAMP Stack using AWS huh?
First, what is a LAMP Stack and what makes it important?
A LAMP Stack is a server configuration archetype that includes all of the necessary software and infrastructure to run a standalone web-application or website. It’s commonly known for its use of the Linux Operating System (L), Apache HTTP Server Software (A), the MySQL Relational Database structure (M), and the PHP programming language (P). With a proper LAMP Stack configuration, installing and configuring your new website or web-app is as easy as ever, since all of its components are contained in one EC2 instance!
What we need before we begin:
-
An Internet Connection.
-
An AWS Free Tier Account.
-
Recommended basic-level AWS experience.
-
An SSH Client like PuTTY.
-
A MySQL visual editor like MySQL Workbench.
A Quick Overview:
This post will cover:
-
The creation of an EC2 Instance
-
Configuring the Security Groups.
-
Attaching an Elastic IP to an instance.
-
How to connect to your instance using SSH.
-
Installing PHP, Apache, and MySQL on an Amazon Linux EC2 instance.
-
Configuring groups and file permissions inside Amazon Linux for Apache.
-
Configuring the MySQL administrator account on a fresh MySQL server installation.
EC2 Creation:
To start off, we need to create our EC2 Instance in AWS.
Head over the AWS Console in your preferred web-browser, and click on Services, look for Compute, and click on EC2.
To launch an Instance on AWS, it’s as simple as clicking the blue “Launch Instance” button!
Choose the Amazon Linux AMI, NOT Amazon Linux 2!
For the purpose of this tutorial, we’ll stay in the Free Tier of AWS and select the t2.micro instance.
Click Configure Instance Details to Continue.
We will only be editing the tags and the security group for this EC2 Instance.
Add a tag called ‘Name’ and in the Value section, name your EC2 Instance.
This will help us identify or Instance down the line when we need to configure it’s IP and other settings.
Configuring EC2 Security Group:
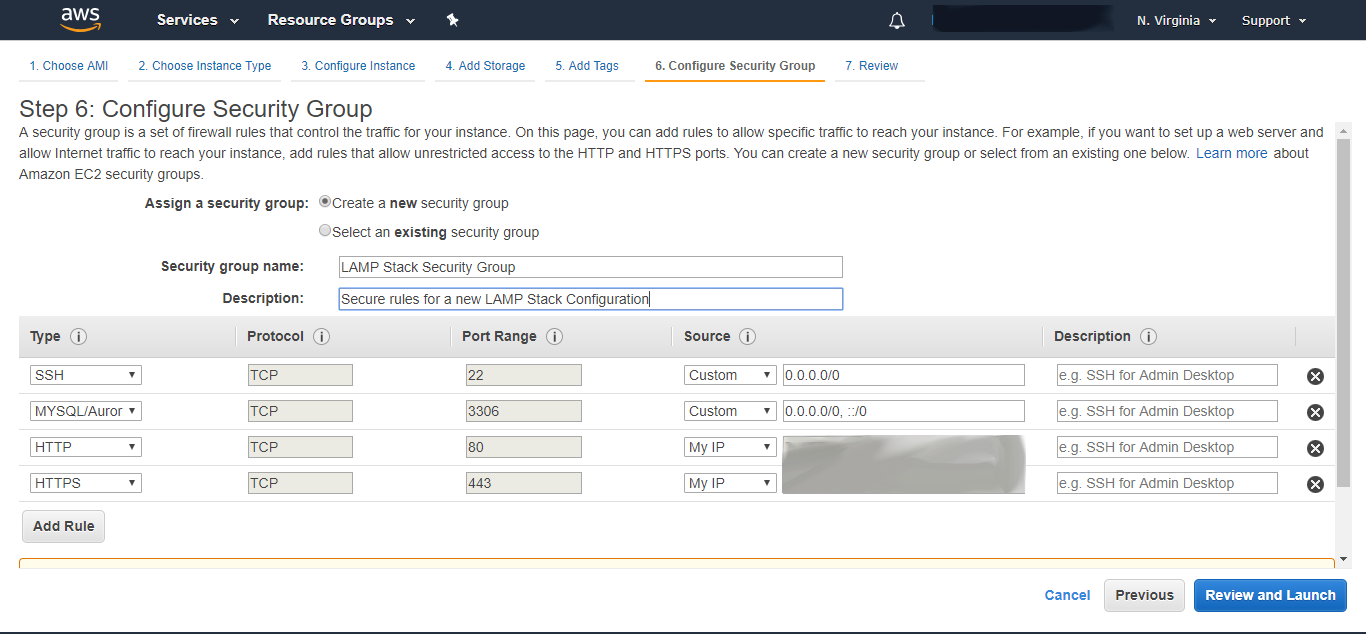
Next, Configure the Security Group. All traffic AWS is denied by default, so we must allow certain traffic to reach our instance so we can install all of our dependencies.
We will add four total rules. So go ahead and add three other rules. Set the types for all of the rules to:
-
SSH
-
MySQL/Aurora
-
HTTP
-
HTTPS
The ports will be automatically configured, just set the Source for the SSH and MySQL rules to ONLY your IP for now, to ensure the security of your new LAMP stack.
Before we move on, go ahead and name your new security group and give it a description, so that you may identify it in case you need to edit the instance’s traffic rules later.
Then, just click review and launch, review your settings and make sure they are correct, and launch your new instance!
A pop-up box will show itself, asking you to select a Key-Pair. Go ahead and create a new one, naming it something identifiable, and placing it somewhere you know you will not lose it. Once it’s gone, you can no longer SSH into your instance.
Give your instance a few minutes to spin up, and make sure your SSH client is ready to go, so that we may configure our Stack!
Associating an Elastic IP to a new Instance:
Now, on the left hand pane, scroll down to Elastic IP’s, under Network and Security.
Allocate a new address, right click on the new address, and select “Associate Address”.
Using the dropdowns, select the new instance, and a private IP. Finish the allocation, and give the Elastic IP a name. Now, just copy the address since we’ll need it later.
Connecting to your New Instance (Windows):
If you’re on Windows, download the latest version of PuTTY to save yourself some time and heartache. If you’re using MacOS, you’re more than welcome to follow along, but you can SSH into your instance from the native command line.
Hit the windows Key, and search for PuTTYgen. Run this program and hit “Load”.
Search for the Private Key File you just downloaded.
Click “Save Private Key”, give it a name, and save it in a secure location.
You do not need a username and password attached to the file.
Now, open up PuTTY, and on the left hand pane, expand the tab “SSH”, and then click on “Auth”.
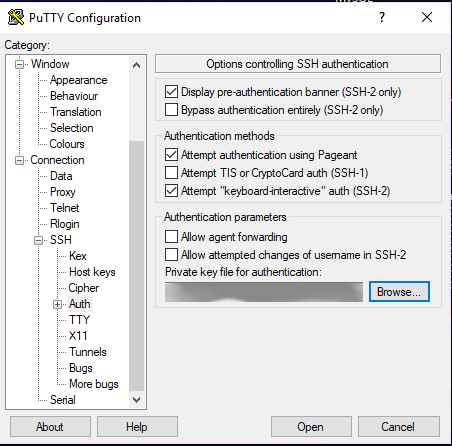
Set the “Private key file for authentication” to the private key you saved from PuTTYgen.
Scroll back up to “Session”, and enter the host name for the new instance. Just copy and paste the IP address that we allocated with Elastic IP, enter a name in the “Saved Sessions” box, and click save, so that you can SSH in with just two clicks!
You can now double click the saved session, just confirm the next dialog box, and the command line will now prompt you for a user, type “ec2-user” and hit enter. Congrats! You’ve made it. The rest is simply configuring file permissions, running updates, and installing packages.
Connecting to your New Instance (MacOS):
For those of you running MacOS, place the original private key somewhere secure and open a new terminal window where you placed your private key. Then run:
-
 chmod 400 your-private-key.pem
 -
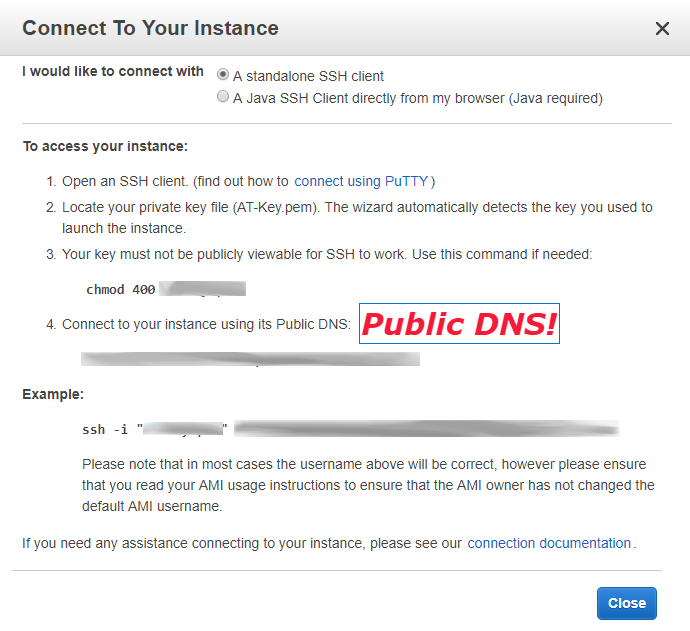
SSH -i “your-private-key.pem” ec2-user@public_dns_name
The public dns name can be found under the “Connect” tab in the EC2 dashboard for your instance.
You should now be able to run commands inside your EC2 instance within the MacOS terminal!
Configuring Linux Groups and File Permissions:
Just follow these simple steps:
-
Run: sudo yum update
Installs and updates to the Amazon Linux Dependencies.
-
Run: sudo yum install -y httpd24 php70 mysql56-server php70-mysqlnd
Installs Apache 2.4, MySQL Server 5.6, PHP 7.0, and the mysqld-php service.
-
Run: sudo service http start && sudo chkconfig httpd on
Start Apache and check for errors.
-
Run: sudo groupadd www
Creates the group www.
-
Run: sudo usermod -a -G www ec2-user
Sets the file structure for group www and the user.
Log out and log back into the SSH client.
The next 4 commands are here to setup the correct file structure and permissions so that Apache can run all of the files placed in the root directory.
-
Run: sudo chown -R root:www /var/ww
-
Run: sudo chmod 2775 /var/www
-
Run: find /var/www -type d -exec sudo chmod 2775 {} \;
-
Run: find /var/www -type f -exec sudo chmod 0664 {} \;
-
Run: sudo nano /etc/php.ini
-
Press CTRL + W and type filesize and hit enter.
-
Replace 2M with 8M on the next line.
-
Press CTRL + X to save the file.
-
Hit y to confirm.
-
And hit enter to confirm again.
-
Run: sudo chkconfig httpd on
-
Check for errors in Apache’s configuration.
Check out your new stack! Enter the the Elastic IP into your browser and see your Amazon Linux AMI Test page!
Configure MySQL install and Creating a Root Account:
Now we just need to configure a root (administrator) MySQL account.
-
Run: mysql -u root -p
-
Just hit enter for the password since we haven’t configured one yet.
-
Go into your browser, and type “my ip” and find out your public IP address so that we can use it in our admin account for an added layer of security.
-
Create the admin user with full permissions:
-
Run: CREATE USER ‘admin’@’___YOUR_IP___’ IDENTIFIED BY ‘___YOUR_PASSWORD___’;
-
Run: GRANT ALL ON *.* TO ‘admin’@’___YOUR_IP___’;
-
Run: GRANT GRANT OPTION ON *.* TO ‘admin’@’___YOUR_IP___’;
-
Now, open your MySQL workbench.
-
Click add connection. (The plus next to MySQL connections)
-
Enter the Elastic IP as the host name.
-
Enter ‘admin’ as the user.
-
And click “Store in Vault” and enter the password you just assigned to the admin user.
-
Test your connection, if successful, continue to the next command.
-
Run: FLUSH PRIVILEGES;
-
Only run this command AFTER confirming you can login with the new root account.
-
Run: sudo chkconfig mysqld on
-
Check for errors in the MySQL service configuration
-
Now head back to the MySQL workbench, and click on “Users” in the Management tab on the left hand side of the screen.
-
Delete all other users other than the admin account we created to ensure the best security practices for your new database configuration.
Summary:
If you made it all the way through, congratulations! You just made your first LAMP Stack! We successfully created an instance with Amazon Linux, installed a MySQL Server, PHP and Apache HTTP Software, as well as configured a root MySQL account.
You can place your web-app files or raw HTML in the /var/www/html/ folder in your instance’s directory to view them like any other website! Just enter the Elastic IP in your browser and navigate to the folders or file you uploaded. I would recommend using an FTP Client like FileZilla to upload your files. Just use the SFTP Protocol when adding a new site to FileZilla, and configure the Key File and user name like we did with PuTTY.
Looking to install WordPress on your new LAMP Stack? Check out our earlier blog post here and just skip to Step 5!
P.S. Be sure to create a new MySQL account to connect to your WordPress database so WordPress isn’t using the root account!
Happy Hunting!